Using Eloquent and Schema Builder Commands Outside Laravel
Hey there,
Today, I will be telling about using Laravel’s Eloquent ORM, and Schema builder outside Laravel with artisan’s Migration commands. I will be using Laravel’s Eloquent ORM, Silex as skeleton (you can also use Pimple as dependency injection container separately), and PHPMig for handling Migrations.
Why? Link to heading
There are couple of reasons I needed this combination:
- I will be making a micro app as a garage project, and I needed a good ORM and migration tool together.
- I don’t like Lumen, and that’s why I don’t want to use it.
- I could also use Phinx as both schema builder and migration handler, but Eloquent ORM already comes with Schema builder classes. I didn’t want to use a second layer for schema builder (Second layer = second connection)
- Eloquent ORM is not (alternative url) loosely decoupled. You can run Fluent Query Builder, and boot use Eloquent ORM in ease, but you can’t run migration commands directly, because Command’s components are not totally decoupled. It also suggested me to install
illuminate/filesystemandilluminate/consoleto run a single command.
I’ll try to describe in very short term:
First, I checked the command definitions, I realized that make:migration command requires Illuminate\Foundation\Composer class. This is not packed as a different class yet. So I needed either mocking this, or the whole laravel/framework package (see where I’m going?).
To run artisan migration commands (this is NOT Schema builder, don’t mix them!) You need illuminate/console package, has a line like this in the execute() method:
return $this->laravel->call([$this, $method]);
This needs the total laravel instance just to call a single command! I just didn’t want to use the whole Illuminate\Contracts\Foundation\Application instance
I tried Googling, also found this guy is also struggling from the exact same problem.
And then, saw this tweet sadly.
@ben_corlett @Anahkiasen @DriesVints decoupling the components isn’t necessarily high priority or a main goal of laravel
— Taylor Otwell (@taylorotwell) December 21, 2013
So I gave up using Artisan commands in my application and in Symfony console command to manage migrations.
As stated previously, I first thought of using Phinx, but I didn’t want to complicate the app. So I decided using Silex / Pimple, illuminate/database and PHPMig.
How I did it? Link to heading
To describe how I managed to bind them together, I think the best approach is to tell directly:
Initial bootstrapping and connecting to the database Link to heading
I need to create a structure for my application, and connect to the database to run migrations.
This is my roughly my composer.json file:
{
  "require": {
    "silex/silex": "~1.3",
    "symfony/yaml": "~2",
    "symfony/console": "~2",
    "davedevelopment/phpmig": "~1",
    "illuminate/database": "~5.1"
  },

  "require-dev": {
    "filp/whoops": "~1",
    "symfony/var-dumper": "~2"
  },

  "autoload": {
    "psr-4": {
      "App\\": "app/"
    }
  },

  "config": {
    "bin-dir": "bin/"
  }
}
This is my folder structure:
-app/
---Commands
-----FooCommand.php
---Controllers
-----FooController.php
---Models
-----FooModel.php
---Database
-----Migrations
-------20150916165830_createFooTable.php
---config.yml
-vendor/
-public/
---index.php
-.gitignore
-bootstrap.php
-composer.json
-composer.lock
-hodor #name of my command
-phpmig.php
In this article, you won’t be needing Controllers etc. I’ve put them nevertheless.
When I run composer install after this, a bin/phpmig file is generated automatically. Keep it there for a while.
Now I needed a configuration file. I chose to use yaml format with Symfony’s yaml package. You can also use a raw PHP array, it’s totally a personal choice.
I have an app/config.yml file like this:
settings:
  timezone: Europe/Istanbul

database:
  connection: mysql
  connections:
    mysql:
      driver: mysql
      host: localhost
      database:
      username:
      password:
      charset: utf8
      collation: utf8_unicode_ci
      prefix: ''
      strict: false
As you can see, it’s the same as config/database.php’s connection credentials section in Laravel. Don’t forget to fill it with correct credentials.
I’ve loaded the configuration file into my application like this:
use Symfony\Component\Yaml\Yaml;

// Loading the configuration file
$app['config'] = $app->share(function () {
    return Yaml::parse(file_get_contents(__DIR__.'/app/config.yml'));
});
(I’ve written the example using Silex, but as you know and can see this is the same syntax with Pimple, which also handles the dependency injection stuff of Silex.)
Now I needed to share the Fluent query builder and boot Eloquent into the app. I’ve added these lines into my /bootstrap.php:
use Illuminate\Database\Capsule\Manager as Capsule;

$app['db'] = $app->share(function() use($app) {

  // Set up Fluent Query Builder..
  $capsule = new Capsule;
  $capsule->addConnection(
    $app['config']['database']['connections'][
      $app['config']['database']['connection']
    ]
  );
  return $capsule;

});

// These two have to be outside closure
// Make the Capsule instance available globally via static methods...
$app['db']->setAsGlobal();
// Setup the Eloquent ORM...
$app['db']->bootEloquent();
So this way, I can run Fluent Query builder (actually the Capsule instance) and run commands in my app anywhere like $app['db']::table('foo')->find(1), Capsule::table('foo')->find(1) or the Eloquent ORM like Foo::find(1)
Writing models are as same as Laravel’s. This is my /app/Models/Foo.php:
<?php

namespace App\Models;

use Illuminate\Database\Eloquent\Model as Eloquent;

class Foo Extends Eloquent {

  protected $table = 'foo';

}
Now let’s test (with Silex): Link to heading
Create a dummy database manually in your SQL engine called foo (or whatever you’ve named in the model) “temporarily”. We will be creating this database later using migrations.
Just add a new route in /public/index.php file (make sure your server is configured correctly), this is my whole /public/index.php file:
<?php

require_once __DIR__.'/../bootstrap.php';

use App\Models\Foo;

// Raw route example:
$app->get('eloquent', function() use($app) {

  dump(Foo::all());

  return 'bar';
});

// Calling a method from Controller example:
$app->get('foo', 'foo.controller:bar');

$app->run();
Now navigate to yoursite.com/eloquent, if you see the dump is an instance of Illuminate\Database\Eloquent\Collection, you’re all set!
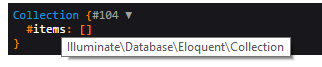
(My items[] key is blank, because the table foo we’ve created temporary is empty)
Now you can delete the table we’ve created “temporarily”, because now we will be creating it using migrations and schema builder!
Now the hard part: Connecting the PHPMig and Schema builder together Link to heading

OK OK, it’s not hard at all
- Now, in normal situations, for a first time, you need to run
bin/phpmig initfrom terminal, and it’ll create two files, one for configuration, another the migrations folder. These will be overwritten by us. So we can skip this.
(If you want to import the PHPMig commands into your application, you can also remove bin/ folder along with phpmig directly. I will tell it in the latter sections of this article)
- Now we need to create the configuration file of PHPMig. Sadly it needs to be in the root folder. Create a new
phpmig.phpfile into root of your application.
<?php

use \Phpmig\Adapter;

use Illuminate\Database\Capsule\Manager as Capsule;

//This is needed for configuration credentials
require __DIR__.'/bootstrap.php';

$app['phpmig.adapter'] = $app->share(function() use ($app) {
  return new Adapter\Illuminate\Database($app['db'], 'migrations');
});

$app['phpmig.migrations_path'] = function() {
  return __DIR__.'/app/Database/Migrations';
};

// I can run this directly, because Capsule is set as globally
// with $capsule->setAsGlobal(); line at /bootstrap.php
$app['schema'] = $app->share(function() {
  return Capsule::schema();
});

return $app;
We have included the /bootstrap.php we’ve created to get database connection, and set it as a constructor in PHPMig’s Laravel adapter. We have also set the schema instance which will be used in migrations’ up() and down() methods here.
- Now let’s create a migration! Run this command inside your terminal:
bin/phpmig generate CreateFooTable
It will create a new migration file in app/Database/Migrations folder, which we’ve set while sharing ($app['phpmig.migrations_path'] into our application).
This is my app/Database/Migrations/xxxxxxx_CreateFooTable.php file:
<?php

use Phpmig\Migration\Migration;

// Needed for Type-hinting
use Illuminate\Database\Schema\Blueprint;

class CreateFooTable extends Migration
{

  protected $table;
  protected $schema;

  public function init() {
    $this->table = 'foo';
    $this->schema = $this->get('schema');
  }

  /**
   * Do the migration
   */
  public function up()
  {
    $this->schema->create($this->table, function(Blueprint $table) {

      $table->increments('id');
      $table->string('title');
      $table->timestamps();

    });

  }

  /**
   * Undo the migration
   */
  public function down()
  {
    $this->schema->drop($this->table);
  }
}
For a cleaner markup, I’ve set the schema and table names in the init() function, and used Illuminate\Database\Schema\Blueprint for type-hinting.
The up() and down() methods were blank, and I’ve written some boilerplate into them. As you can see, it’s looks quite similar to the Laravel’s migration and schema builder combination.
- Bonus: Adding PHPMig commands to your Symfony / Console application:
This is quite easy actually. Since they are actually Symfony console commands, you just need to use them and include them into your app.
This is what I did in my example hodor application
#!/usr/bin/env php
<?php

require_once __DIR__.'/bootstrap.php';

use Symfony\Component\Console\Application;

// PHPMig commands
use Phpmig\Console\Command;

$application = new Application("Hodor", '0.1.0');

// Let's import PHPMig's commands into our own Application
$phpmig_commands = [
  new Command\CheckCommand(),
  new Command\DownCommand(),
  new Command\GenerateCommand(),
  new Command\InitCommand(),
  new Command\MigrateCommand(),
  new Command\RedoCommand(),
  new Command\RollbackCommand(),
  new Command\StatusCommand(),
  new Command\UpCommand(),
];
foreach($phpmig_commands as $command) {
  $command->setName('phpmig:'.$command->getName());
}
$application->addCommands($phpmig_commands);

// Run it
$application->run();
Now, it’s time to test! Link to heading
If everything went okay, when you run the console command to migrate, it’ll say it’s migrated.
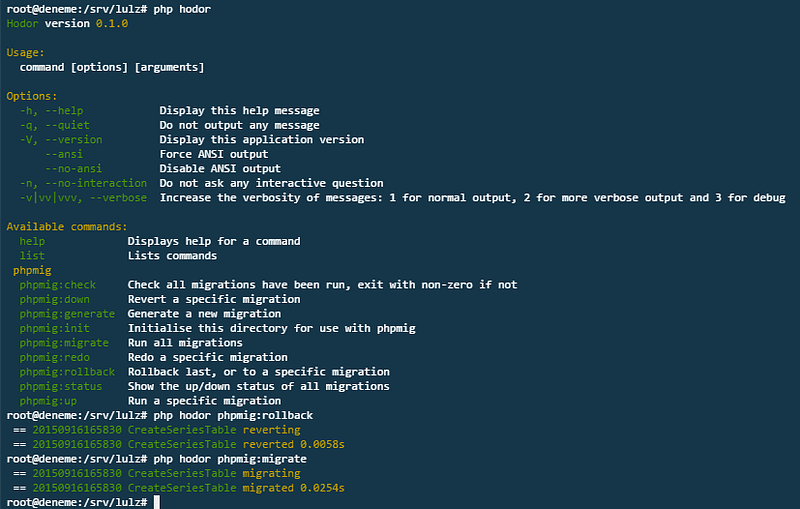
When you run php hodor phpmig:migrate (or bin/phpmig migrate without the custom console application), it first creates a migrations table, then runs the migration files that are not ran yet.
Now you can run migrations using Laravel’s schema builder, without the need of artisan or tons of other dependencies!
Need this as a package? Link to heading
Don’t worry, I need it too! :) That’s why I’ve created a repository in GitHub.
Just navigate to Ardakilic/silex-skeleton-app on GitHub, download, run composer install and start developing your micro App!.
Also, please feel free to send pull request to the repository. I’ll gladly consider them.